cScanTWAIN - version 4
Looking for
version 2 or
version 3
Sample File Structure
/public
/lib
/cScan
cscan.min.css
cscanConfig.trial.js // Development
cscan.trial.min.js // Development
cscanConfig.js // Production
cscan.min.js // Production
pdf.min.js
pdf.worker.min.js
If you want to allow users to download the companion application then include cScanTWAIN.exe
Reference
CSCAN_DOWNLOAD_LINK configuration for more detail.
cScanTWAIN.exe
cScanTWAIN consists of only a few files that need to be included in the HTML document. Basic understanding of HTML and CSS is a pre-requisite, so this should need little explanation. Somewhere
you will need to call the Javascript function
csharks.cScanShow(); which will initiate the scanning process.
<html>
<head>
<link rel="stylesheet" href="/lib/cScan/cscan.min.css"/>
</head>
<body>
<button onclick="csharks.cScanShow();">SCAN</button>
<script src="/lib/cScan/pdf.min.js" type="module"></script>
<script src="/lib/cScan/cscanConfig.js"></script>
<script src="/lib/cScan/cscan.min.js"></script>
</body>
</html>
ORDER OF INCLUSION
Make sure the configuration file "cscanConfig.js" is included before cscan.min.js, so that it can be confidently accessed by the component, and place the CSS at the top in the HEAD
section of your HTML.
PDF SUPPORT FILES
You only need to include pdf.min.js because pdf.worker.min.js is dynamically loaded but the files must be in the same directory.
Support for client side PDF is provided by the
Mozilla PDF.js project.
Companion Application
The
cScanTWAIN.exe companion application represents a small 32-bit Windows executable that is non-intrusive and generally does not require any special installation routines or
administrative privileges. It is required and acts as a bridge between the web application and TWAIN compliant scanner. cScanTWAIN.exe must be on the client PC and can be in any
directory,
so long as it can be executed.
RUN AS AN APPLICATION
cScanTWAIN.exe is a simple application and when executed will place a small icon in the system tray.
This works great for those with little Windows knowledge or IT support and when there is only a single user that will log in at any one time. Sometimes it is preferable to put a
shortcut to the companion application into the users startup folder, or create a desktop shortcut making it easier for the user to find and execute.
RUN AS A WINDOWS SERVICE
(may require administrative privileges)
If you wish to install cScanTWAIN as a Windows Service then use the "--service" argument. This may be a good choice when more than one user logs into the same workstation using the
Windows "switch user" feature.
To install and run as a Windows service, get to a terminal window command prompt and issue the following commands using the Service Control Manager (SCM):
sc create cScanTWAIN binPath="c:\YourPathToEXE\cScanTWAIN.exe --service" (replace YourPathToEXE to the path where you installed cScanTWAIN.exe)
sc start cScanTWAIN
sc stop cScanTWAIN
To Delete the Service:
sc delete cScanTWAIN
Configuration
Configuration settings are in the cscanConfig.js file.
LICENSE_KEY
Description: Domain registered license key.
The license key will be provided upon successful purchase of our SDK. You are free to download, implement, and demo the TRIAL SDK for as long as you wish without restriction. However,
without a valid license key then a watermark will appear on each scanned image obtained by our SDK.
CSCAN_DOWNLOAD_LINK
Description: Show a download link to the cScanTWAIN.exe companion application for distribution.
Recommendation: Remove this from your cscanConfig.js if you are not using it.
Example: "/lib/cScan/cScanTWAIN.exe"
If used then the cScanTWAIN.exe file must on your web server where it is accessible using the defined link.
CSCAN_ADMIN_NOTICE
Description: Show a notice of information.
Recommendation: Remove this from your cscanConfig.js if you are not using it.
Example: “If you need assistance then please contact your system administrator”
CSCAN_PORT
Description: The port that the cScanTWAIN.exe companion application should listen on.
Default: 26813
This normally does not need to be changed
Recommendation: Remove this from your cscanConfig.js when you are using default value.
Notes: This is only required if you experience a port conflict. If changing from the default port 26813 then the cScanTWAIN.exe companion
application must be executed with an argument to specify the alternate port. This is global to all cScanTWAIN.exe users, so take careful consideration when deciding to use a different
port value.
--port=nnnnn
Example: cScanTWAIN.exe --port=25155
CSCAN_FILETYPE
Description: Represents the type of base64 data that will be returned.
Allowed Values: [PDF, JPEG] default=PDF
Recommendation: Remove this from your cscanConfig.js if you are using the default value.
CSCAN_MODE
Description: Will the cScanTWAIN dialog or the developer callback receive the base64 image data.
Allowed values: [1, 2] default=1
Recommendation: Remove this from your cscanConfig.js if you are using the default value.
MODE 1
The cScanTWAIN dialog is an out-of-the-box user interface that receives the scanned image. When used without showing the default scanner user dialog then the developer maintains more
control over what scanner settings are allowed by the user. In
this mode the cScanTWAIN dialog incorporates a simple image viewer including a few options, such as flip and delete, as well as a PDF import (if implemented), and the upload to server
functional operation.
With either mode the developer will need backend server code to receive the base64 encoded image data. Uploads are sent to the URL defined in CSCAN_UPLOAD_URL using the FetchAPI via a
multipart form POST request.
This mode supports TWAIN and sometimes WIA depending on the manufacturers implementation, and when selecting a WIA source device, the settings implied by all Mode 1 configurations may not
apply as one would expect. This is because WIA is not actually TWAIN and WIA devices are defined for use with the Windows Imaging Acquisition API, which at this time cScanTWAIN
operates in a TWAIN compliant manner.
Mode 1 also supports the use of the scanners default dialog as set by the "UI" parameter in the scanner profiles. Regardless of which mode is used, anytime the scanner default
dialogs are used then the user will have the most control over the scanner settings as possible.
MODE 2
The scanner default dialog will be used and the cScanTWAIN dialog will be suppressed. Scanned images acquired by the scanner will be returned via a callback that the developer must
implement. Only an occasional "flash" message may be displayed to provide status updates.
This mode may support both TWAIN and WIA depending on the manufacturers implementation and regardless of which mode is used, anytime the scanner default dialogs are used then the user will
have the most control over the scanner settings as possible.
In this mode the developer is responsible for implementing an image callback function and managing the returned base64 encoded image data.
You normally would not want to create this
callback function unless you are using mode 2, however, if this callback function is defined in your javascript then it will be called regardless of which mode you implement.
Example:
function cScanTWAIN_OnAcquireImage(b64Image) {
console.log(b64Image);
}
Here is an extract of the raw base64 encoded image returned by cScanTWAIN:
/9j/4AAQSkZJRgABAQEAyADIAAD/2wBDAAYEBQYFBAYGBQYHBwYIChAKCgkJ...
Notice only the base64 data is provided and it does not contain the associated mime type:
"data:image/jpeg;base64," or "data:application/pdf;base64,"
Reference: Sample code snippets that receive image data via the callback.
function cScanTWAIN_OnAcquireImage(b64Image) {
//
// Assuming we are expecting JPEG data, CSCAN_FILETYPE: "JPEG"
//
let elem = document.createElement(“img”);
elem.src = “data:image/jpeg;base64,” + b64Image;
document.body.appendChild(elem);
//
// Assuming we are expecting PDF data, CSCAN_FILETYPE: "PDF" (default=PDF)
//
let byte = base64ToArrayBuffer(response);
let blob = new Blob([byte], {type: "application/pdf"});
window.open(URL.createObjectURL(blob), "_blank");
}
Mode 1 configurations
CSCAN_UPLOAD_URL
Description: URL where the base64 image data will be uploaded via a multipart form POST request. Change this to match your upload destination
URL.
Recommendation: Instead of duplicating backend upload code for different documents, create a generic upload backend and override
CSHARKS.CSCAN_UPLOAD_PREFIX within your javascript, so that your backend can easily identify what is being uploaded.
CSCAN_HEADERS
Description: Post header object
Recommendation: Remove this from your cscanConfig.js if you are not using it.
This is a Javascript Object Representing the Headers to send with the Fetch API call. cScanTWAIN utilizes the Javascript Fetch API for uploading and if this directive is set then it
will be sent in the headers object. May be useful for sending to a third party backend storage such as Amazon S3.
Example: CSHARKS.CSCAN_HEADERS = { Authentication: "Bearer Token" }
According to the Fetch API documentation, the following are the forbidden Fetch API header names.
Content-Length
Host
Referer
Access-Control-Request-Headers
Access-Control-Request-Method
CSCAN_UPLOAD_PREFIX
Description: Prefix applied to the uploaded file POST variable filenames.
Default: "CSCANTWAIN_"
Recommendation: Remove this from your cscanConfig.js if you are use the default.
File Naming Convention: CSHARKS.CSCAN_UPLOAD_PREFIX + cscanImage-pageNumber
Example POST request: CSCANTWAIN_cscanImage-1
CSCAN_UPLOAD_IMMEDIATELY
Description: Upload the image immediately after it is acquired.
Allowed Values: [true, false] default=false
Recommendation: Remove this from your cscanConfig.js when using the default value.
Uploads will occur immediately after a scan operation has completed. This setting does not apply to PDF imports. If you set this to TRUE then you will likely use the default
setting for CSCAN_DELETE_AFTER_UPLOAD to prevent the user from inadvertently uploading the same scan more than once.
CSCAN_DELETE_AFTER_UPLOAD
Description: Delete Scanned Images from the cScanTWAIN dialog after upload is complete.
Allowed Values: [true, false] default=true
Recommendation: Remove this from your cscanConfig.js when using the default value.
CSCAN_CLOSE_AFTER_UPLOAD
Description: Automatically close the cScanTWAIN dialog after the upload is complete.
Allowed Values: [true, false] default=true
Recommendation: Remove this from your cscanConfig.js when using the default value.
Note: All images are removed from the cScanTWAIN dialog whenever it is closed.
CSCAN_UPLOAD_MAX_PAGES
Description: Max pages allowed to upload
Allowed Values: [Integer, -1=Unlimited]
Recommendation: Setting this value to match your use case requirements will help mitigate unnecessary resource consumption.
Attempts to upload more than this threshold will result in a warning error and the images will not be submitted.
Note: Your server may have payload size and memory restrictions and should be adjusted for your expected max upload constraints. If you server is
not properly configured to accept the payload size of the uploaded documents, then you may notice that the client (browser) returns a successful upload response but the server did not
accept your files.
Reference: In PHP the server payload restrictions would be found in the php.ini configuration:
post_max_size
memory_limit
upload_max_filesize
CSCAN_IMPORTPDF
Description: Allow importing of an external PDF document
Allowed Values: [true, false] default=true
Recommendation: Remove this from your cscanConfig.js when using the default value.
Note: When this is true, and the default CSCAN_FILETYPE="PDF" is used, should the user import a multipage PDF then the delete image button will be
disabled. This is
because we have no good method of parsing multiple pages from a single multipage PDF document and therefore cannot keep an accurate index compendium.
CSCAN_PROFILES
Description: Scanner profiles represent desired scanner settings for different types of documents that you expect to be scanned.
Note: Required
At least one profile must be defined and will be used when no other profiles exist, otherwise the user can make a selection. It is possible to pass a scanner profile during the call
to csharks.cScanShow(profileNumber) with the profileNumber representing the profile you wish to have automatically selected. When passing a profile then scanning will begin without
the user having to hit the scan button found on the cScanTWAIN dialog.
Example: Profile configurations are zero based, so using the sample profiles below then we will pass a value of one to use the Color Document profile: csharks.cScanShow(
1 );
Reference: Sample profiles
In the below sample you will notice two different Driver's License profiles that were provided to illustrate different PIXEL, DPI, CROP and THRESHOLD parameters. These two profiles
will return essentially the same region of the document but take notice of the different CROP parameters. This is because a 300 DPI document contains more pixels than a 200 DPI
document.
CSCAN_PROFILES: [
{"NAME": "B/W Document Sample"},
{"NAME": "Color Document Sample", "PIXEL": 2},
{"NAME": "Driver's License 200 DPI Sample", "CROP": "0, 0, 650, 400", "THRESHOLD": 120},
{"NAME": "Driver's License 300 DPI Sample", "PIXEL": 1, "DPI": 300, "CROP": "0, 0, 975, 600"},
{"NAME": "Grayscale Sample", "PIXEL": 1},
{"NAME": "Show Scanner UI Sample", "PIXEL": 2, "UI": true},
{"NAME": "Brightness & Contrast Sample", "BC": "800, -250"}
{"NAME": "Simple Duplex Scan", "DUPLEX": true"}
]
PROFILE PARAMETERS
Profiles consist of parameters that can be assigned to achieve your desired scan result. All profiles have a default value and when the default value is desired then there is no
requirement to assign that parameter.
Recommendation: All profile parameters have a default value and when the default value is used then there is no need to assign that parameter. Simply
leave it off.
When using the "UI" parameter and allowing the scanners default dialog to be shown, then your parameters act only as a starting point for the scanner settings. The user will have full
control over the scanner settings when using the scanners own dialog.
PIXEL
Description: The pixel type.
Allowed Values: [0, 1, 2] default=0 (0=Black and White, 1=Grayscale, 2=Color)
Black and White typically yields the smallest resulting file size and you should set this according to your use case requirements. For example you may find that a grayscale image
results in a larger file size than a color image. This is due to the amount of compression that can be achieved for different color ranges. You will want to experiment with these
settings based on the documents that will be scanned and your desired output requirements.
DPI
Allowed Values: Values supported by the scanner.
Typical values: [300, 200, 150, 100] default=200
Recommendation: DPI of 200 is a good starting choice for quality vs file size and is generally supported by all scanners.
Note: If your scanner does not support the value specified then it will use its own default value.
Higher DPI results in better quality but may produce larger file sizes, so set this according to your use case requirements.
Sampling a full page 8x11 black and white document returned as PDF using different DPI settings. 300=42k, 200=31k, 150=25k

UI
Description: Wether or not to show the scanners own default user interface.
Allowed Values: [true, false] default=false
Note: Showing the scanners default dialog provides the user with the most control over the scanner settings.
DUPLEX
Description: Use duplex scanning
Allowed Values: [true, false] default=false
Note: If the scanner does not support duplex scanning then this setting should have no impact.
CROP
Description: This is the cropping region in pixels to be returned from the scanned document.
Represents: Top, Left, Right, Bottom
Recommendation: If no cropping desired then do not include this parameter.
Note: If "UI": true then no cropping will be performed.
This tool may be of use determining your cropping values:
Pixel Calculator
BC
Description: Brightness and contrast.
Allowed Values: [-1000..1000, -1000...1000] default=0, 0
Recommendation: Most modern scanners manage this automatically and therefore this parameter rarely needs to be used.
THRESHOLD
Description: Intensity value for black and white documentsl. Levels less than THRESHOLD are set to black and the reminder to white.
Allowed Values: [0..255] default=175
Note: Only applies to Black and White documents (ie: PIXEL = 0)
In the profile samples above you can see that the "200 DPI Drivers' License" profile uses a threshold of 120 which enhances the conversion of a colored background license into
a 1 bit black and white image. As an example, certain colors in the red spectrum may be impacted by this value and could end up faded or simply removed from the document.
Depending on your use case requirements then you may want to experiment with this value.
Javascript Override and Callback
// cScanTWAIN overrides are useful for changing configuration properties. As in this example we could have different configurations from what is already set in the cscanConfig.js
file. You can easily override this from within your pages javascript. Below we are using a different upload prefix.
//
// OVERRIDE
//
$(() => {
CSHARKS.CSCAN_UPLOAD_PREFIX: "ACCOUNTING_",
});
//
// CALLBACK - if you have defined a callback function in your javascript then it will be called by cScanTWAIN.
//
// This callback function receives the base64 encoded image data.
function cScanTWAIN_OnAcquireImage(b64Image) {
console.log(b64Image);
}
function cScanTWAIN_OnDialogClosed() {
console.log("Dialog has closed");
}
// This function receive the JSON response that is returned by your backend servers upload url.
// If you are using MODE 1 then at a minimum your backend code must return '{ "status":"Success" }
// Please reference the sample server side PHP code
// In our demo we return: '{ "status":"Success", "fileName" : "' . $baseFileName . '" }'
function cScanTWAIN_OnUploadComplete(response) {
console.log(response);
let obj = JSON.parse(response);
alert(obj.fileName);
console.log("Upload complete");
}
Sample Server Side PHP Code
You should be able to gleam enough intelligence from these code snippets to jump start your efforts.
Uploading the base64 encoded images to the backend server is generally straight forward. Scanned images are sent using the POST method as base64 encoded files within a multipart form. This
should be easily adaptable to most backend web development languages and frameworks. You probably want to handle error conditions that may occur server side.
Since PHP does not have native support for PDF files then we need to use one or more third party libraries. For our solution we will be using the TCPDF and FPDI libraries.
TCPDF:
https://tcpdf.org
FPDI:
https://www.setasign.com/products/fpdi/about/
Why two libraries?
It depends on your use case requirements, so if you are expecting base64 encoded PDF files (ie: CSCAN_FILETYPE: "PDF"), and you want all the uploaded base64 image data to be combined into
a single multipage PDF, then we need the additional FPDI library to perform the merge function. However, if you are expecting base64 encoded JPEG files (ie: CSCAN_FILETYPE: "JPEG")
but still want to save as PDF on the server then we would only need the TCPDF library.
Lets take a look at a var_dump of the $_POST variable from our backend code. The string value will be either base64 encoded PDF or JPEG depending on your CSCAN_FILETYPE configuration:
var_dump($_POST);
array(2) {
["DEMO_cscanImage-1"]=> string(135424) "/9j/4AAQSkZJRgABA…”
["DEMO_cscanImage-2"]=> string(141056) "/9j/4AAQSkZJRgABA…”
}
CSCAN_FILETYPE: "PDF" or "JPEG"
In this sample we are demonstrating code that accepts base64 encoded data for both PDF or JPEG, and we will be saving our final output as a multipage PDF file. You can build support
for both format types or implement just the code required for your expected format.
// Save to a multipage PDF
$uploadDir = 'ThePathToYourDestination';
if (key($_POST) !== null) {
$namePrefix = isset($_POST) ? substr(key($_POST), 0, strpos(key($_POST), '_')) : '';
} else {
$namePrefix = 'Unknown';
}
$baseFileName = $namePrefix . '_' . date('YmHis');
$outputFileName = $uploadDir . $baseFileName;
$pdf = new Fpdi();
$pdf->setPrintHeader(false);
$pdf->setPrintFooter(false);
foreach ($_POST as $k => $v) {
$decodedImageData = base64_decode($v);
$isPDF = str_starts_with($decodedImageData, '%PDF');
if ($isPDF) {
// PDF base64
// Why do we need the page count? If your file type is PDF (ie: CSCAN_FILETYPE: "PDF") then each scanned document is stored as single page base64 encoded
data. However, if you allow PDF import (ie: CSCAN_IMPORTPDF: true), and the user imports a multipage PDF, then that single base64 encoded image data will contain all the pages of
the PDF, so we need to make sure we get all the pages.
$pgCnt = $pdf->setSourceFile(StreamReader::createByString($decodedImageData));
for ($pageNo = 1; $pageNo <= $pgCnt; $pageNo++) {
$pageId = $pdf->importPage($pageNo, \setasign\Fpdi\PdfReader\PageBoundaries::MEDIA_BOX);
$size = $pdf->getTemplateSize($pageId);
$pdf->addPage($size['orientation'], $size);
$pdf->useTemplate($pageId);
}
} else {
// JPEG base64, so our PDF will insert a JPEG image
// Our use case does not require high density results, so we will reduce the quality to save file space
$pdf->setJPEGQuality(45);
// We want to set page orientation appropriately, so we need the image info
$imageInfo = getimagesizefromstring($decodedImageData);
$w = intval($imageInfo[0]);
$h = intval($imageInfo[1]);
$orientation = ($w != $h ? ($w > $h ? 'L' : 'P') : 'P');
$pdf->AddPage($orientation);
// Now we will add the JPEG image to our PDF document
$pdf->Image('@' . $decodedImageData, 15, 5, 0, 0, 'JPEG', '', '', true, 100);
}
}
// All done, lets output our file
$pdf->Output($outputFileName . '.pdf', 'F');
// JSON response to the client
echo '{ "status":"Success", "fileName" : "' . $baseFileName . '" }';
// Upon success you MUST at a minimum return JSON '{ "status":"Success" }', otherwise its considered a failure.
CSCAN_FILETYPE: "JPEG"
// Save to individual jpeg files
$uploadDir = 'ThePathToYourDestination';
if (key($_POST) !== null) {
$namePrefix = isset($_POST) ? substr(key($_POST), 0, strpos(key($_POST), '_')) : '';
} else {
$namePrefix = 'Unknown';
}
$baseFileName = $namePrefix . '_' . date('YmHis');
$outputFileName = $uploadDir . $baseFileName;
foreach ($_POST as $k => $v) {
// In our demo, variable $k is our file name: DEMO_cscanImage-1
// Extract the page number.
$page = (int) filter_var($k, FILTER_SANITIZE_NUMBER_INT);
// Get the image and decode
$b64Image = $v;
$decodedImage = base64_decode($b64Image);
// Save to jpeg
file_put_contents($outputFileName . '_' . $page . '.jpg', $decodedImage);
/*
// As an alternative we could use GdImage to further reduce the file size.
$image = imagecreatefromstring($decodedImage);
imageinterlace($image, true); // Not required but seems to reduce the image size about ~1k
imagejpeg($image, $outputFileName, 45); // Jpeg quality 0-99 with higher being better quality
*/
}
// JSON response to the client
echo '{ "status":"Success", "fileName" : "' . $baseFileName . '" }';
// Upon success you MUST at a minimum return JSON '{ "status":"Success" }', otherwise its considered a failure.
Hints & Troubleshooting
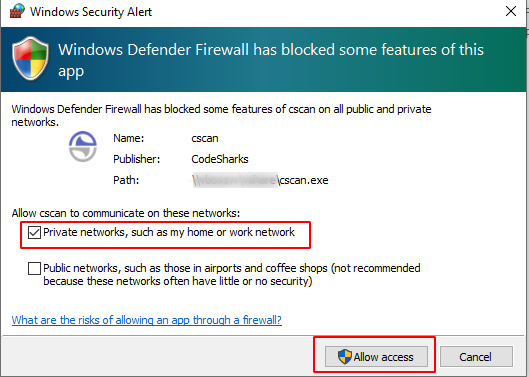
Windows Firewall
Windows may block the execution of the cScanTWAIN.exe companion application. Provided this setting works with your deployment, it is our recommendation to only allow your private network. The
cScanTWAIN.exe companion application only needs to communicate with the browser from the localhost and does not need access to the internet. Please consult with your System
Administrator.
Security with CORS (Cross-Origin Resource Sharing) and the Companion Application
The default is for the cScanTWAIN.exe companion application to allow only localhost origin and honors only specific request types. It will not respond to other requests, forged or
otherwise, and specifically works as a bridge between your web application and your TWAIN device.
TWAIN Compliant Scanner
We have used the most basic scanner settings possible to cover a broad range of devices. Most modern scanners should work without issue but if you run across a specific problem then
we would like to hear about it.
Customizing the Viewer
This can be done by overriding the basic CSS with your own CSS file. We do not recommend modifying the css file provided with the application as this could be overwritten with a
future release.
Below is a sample override of the viewer and buttons background-color. You can place this at the top of your HTML within the <head> section. Make sure to place it after the
inclusion of cscan.min.css and depending on where you put your custom CSS then you may need to use the !important property.
<style>
.cscanModalWindow {
background-color: gray;
}
.cscanButton:hover {
background-color: #ffd1d1;
}
</style>
HAPPY SCANNING...
Download a Trial
