cScanTWAIN - version 3
Looking for
version 2 or
version 4
Quick Start
This section offers a brief overview for how to get started and what you need to do as a developer to easily add scanning capabilities to your web application.
Typical Deployment File Structure
This is just a sample, you can place the files anywhere accessible by your web server.
/public
/lib
/cScan
cscan.min.css
cscanConfig.js
cscan.min.js
If you want PDF import support then include pdf support files.
These do not need to be in the same path as cscan.min.js but they do need to be in the same path together.
Supported in operating mode 1.
pdf.min.js
pdf.worker.min.js
If you want to allow downloading of the companion application and associated support files,
simply include them in a distributable format such as a .zip file or create your own .msi installer
see CSCAN_DOWNLOAD_LINK in the cscanConfig.js configuration file
cScanTWAINdist.zip [your distributable of choice]
Including files during development
cScanTWAIN consists of only a few files that need to be included in the HTML document. Basic understanding of HTML and CSS is a pre-requisite, so this should need little explanation. Somewhere you will need to call the Javascript function csharks.cScanShow() which will open the scanner dialog and allow the user to begin scanning.
<html>
<head>
<link rel="stylesheet"
href="/lib/cScan/cscan.min.css"/>
</head>
<body>
<button onclick="csharks.cScanShow()">SCAN</button>
<script src="/lib/cScan/pdf.min.js"></script>
<script src="/lib/cScan/cscanConfig.js"></script>
<script src="/lib/cScan/cscan.min.js"></script>
</body>
</html>
ORDER OF INCLUSION
Make sure the configuration file "cscanConfig.js" is included before cscan.min.js, so that it can be confidently accessed by the component, and place the CSS at the top in the HEAD section of your HTML.
PDF SUPPORT
If you want PDF import support then you only need to include pdf.min.js as shown. The pdf.worker.min.js is
dynamically loaded but it must be in the same directory as pdf.min.js
Including via a CDN
PDF.js is hosted on several free CDNs:
https://www.jsdelivr.com/package/npm/pdfjs-dist
https://cdnjs.com/libraries/pdf.js
https://unpkg.com/pdfjs-dist/
Support for PDF is provided by the
Mozilla PDF.js
project.
Companion Application Distributables
The
cScanTWAIN and accompanying .dll files represent a small 32-bit Windows only executable that is non-intrusive and generally does not require any special installation routines or administrative privileges. All required files can be extracted to a directory of your choosing and the .exe can be executed. This companion application is required and acts as a bridge between your web application and your TWAIN compliant scanner.
APPLICATION or WINDOWS SERVICE
cScanTWAIN.exe is a simple application and when executed will place a small icon in the system tray.
This works great for those with little Windows knowledge or IT support, and when there is only a single user that will log in to the computer at any one time. Organizations will often put a shortcut to the companion application into the users startup folder, or they will create a desktop shortcut making easy for the user to execute.
WINDOWS SERVICE
If you wish to install cScanTWAIN as a Windows Service, then use the "--service" argument. This may be a good choice when more than one user logs into the same workstation using the Windows "switch user" feature.
To install and run as a Windows service ( may require administrative privileges ), get to a terminal window command prompt. Change directories to where cScanTWAIN.exe is located and then execute the following commands using the Service Control Manager (SCM):
sc create cScanTWAIN binPath="c:\pathToExe\cScanTWAIN.exe --service" (replace pathToExe to the path where you installed the files)
sc start cScanTWAIN
sc stop cScanTWAIN
To Delete the Service:
sc delete cScanTWAIN
Configuration
Configuration settings are in the cscanConfig.js file. To help simplify your life as a developer we have attempted to minimize required and optional configurations.
Required Settings
PRODUCT_KEY
The product key will be provided upon successful purchase of our SDK. You are free to download, implement, and demo the SDK for as long as you wish without restriction. However, without a valid product key then a watermark will appear on each scanned image obtained by our SDK.
CSCAN_PORT
Description: The port that the .exe application should listen on.
This normally does not need to be changed unless you have a port conflict. If
changing from the default 26813, the cScanTWAIN companion application must be
executed with an argument: --port=nnnnn
Example: cScanTWAIN.exe --port=25155
CSCAN_OPERATING_MODE
Description: The mode determines if cScanTWAIN or the Scanner default dialog are used.
OPERATING MODE 1
The cScanTWAIN dialog is an out-of-the-box user interface to the scanned image and
all MODE 1 configuration settings must be established. This mode offers the developer
more control over what scanner settings are allowed by the user and incorporates an
image viewer window with various options including upload to server.
This mode supports TWAIN and uses all Mode 1 configuration settings.
OPERATING MODE 2
The scanner default dialog will be used.
This mode may support both TWAIN and WIA depending on the manufacturer and their
implemented features. This mode allows the user to have the most control over the
scanner settings as possible and in this mode, the cScanTWAIN dialog is suppressed.
Only an occasional "flash" message to provide status updates may be presented.
In this mode, the developer is responsible for implementing an image callback function
that will receive the base64 encoded image data:
function cScanTWAIN_OnAcquireImage(b64Image) {
console.log(b64Image);
}
OPERATING MODE 1 - Below are Required for MODE 1
CSCAN_UPLOAD_URL
Description: URL where to upload the scanned images
URL where the image data will be uploaded via a multipart form POST request. Change this to match your upload destination URL.
Recommendation: Instead of duplicating backend upload code for different documents, create a generic upload backend and override CSHARKS.CSCAN_UPLOAD_PREFIX within your javascript, this way your backend can easily identify what is being uploaded. Further down in this guide is a sample code section that uses PHP as the backend.
CSCAN_HEADERS
Description: Post header object
This is a Javascript Object Representing the Headers to send with the Fetch API call. cScanTWAIN utilizes the Javascript Fetch API for uploading and if this directive is set then it will be sent in the headers object. May be useful for sending to a third party backend storage such as AWS S3.
ex: CSCAN_HEADERS = { Authentication: "Bearer Token" }
CSCAN_UPLOAD_PREFIX
Description: Prefix applied to the uploaded file name.
The resulting post variable during upload will be prefixed with this setting.
File Naming Convention: CSHARKS.CSCAN_UPLOAD_PREFIX + cscanImage-pageNumber
Example POST request: DEMO_cscanImage-1
CSCAN_UPLOAD_IMMEDIATELY
Description: Upload the image immediately after it is acquired.
Uploads will occur immediately after a scan operation has completed. This setting does not apply to PDF imports. If you set this to TRUE then you likely will set CSCAN_DELETE_AFTER_UPLOAD to TRUE in order to prevent the user from inadvertently uploading the same scan more than once.
CSCAN_DELETE_AFTER_UPLOAD
Description: Delete Scanned Images from the cScanTWAIN dialog after upload is complete.
CSCAN_CLOSE_AFTER_UPLOAD
Description: Automatically close the cScanTWAIN dialog after uploading is complete.
Note: All images are removed from the cScanTWAIN dialog whenever it is closed.
CSCAN_UPLOAD_MAX_PAGES
Description: Max pages allowed to upload
Note: Your server may have payload size restrictions and should be adjusted to allow your desired upload size. For example: In PHP this would be in the servers php.ini under the post_max_size directive.
Attempts to upload more than this threshold will result in a warning error and the images will not be submitted. (-1 = unlimited )
CSCAN_SCANNER_PIXELTYPE
Description: Set the pixel type desired
0 Black/White (1 bit depth)
1 Gray scale (8 bit depth)
2 Full RGB (24 bit depth)
CSCAN_REDUCE_IMAGE_SIZE_QUALITY
Description: Reduce the scanned image size after acquisition with values between 0 and 1
Common values: 0.25 (25 percent), 0.50, 0.75, 0.90 (90 percent)
0 = no reduction
Applying a value here will apply a reduction to the image. Default images already have a standard compression, so applying a quality percent of 0.90 for example will result in a larger resulting image. Image size reduction, depending on your use case, can save disk space but may impair the final image quality. You should experiment with this setting to find your optimal desired output for your use case.
CSCAN_SCANNER_DPI
Description: DPI of the scanned image
Optional Settings - Operating MODE 1 or 2 - these can be commented.
Description: These will be shown in a dialog when the cScanTWAIN companion application is not detected to be running.
CSCAN_DOWNLOAD_LINK
Description: Show a download link to the cScanTWAIN companion application
When used, you must supply the bundled files somewhere on your server where they can be accessed by the link you provided. You should also provide some instructional information so the user understands what they need to do with the files once downloaded.
CSCAN_ADMIN_NOTICE
Description: Show a notice of information.
File Type - PNG
The resulting file type will be a base64 encoded png. Unlike other solutions that attempt to upload a multipage TIFF or PDF file, we selected the simplicity of the PNG file type. There are a variety of libraries and tools available for most programming languages that manipulate both TIFF and PDF, however, these libraries are often cost prohibitive.
The PNG file can generally be manipulated and managed natively and continues to offer a universal file format that is easy to work with and that remains performant from client to server.
When the image files are uploaded to the server they are sent as base64 via a multipart form POST request with the following file format:
CSCAN_UPLOAD_PREFIX + "cscanImage-" + pageNumber
Example for a (3) page document:
DEMO_cscanImage-1
DEMO_cscanImage-2
DEMO_cscanImage-3
etc...
Sample Javascript Override and Callback
// cScanTWAIN overrides are useful for changing configuration properties. As in this example, lets say we have different web pages where we want the UPLOAD URL to be change from what is already configured in the cscanConfig.js file. You can easily override this from within your pages javascript.
$(() => {
CSHARKS.CSCAN_UPLOAD_URL = "/differentDestinationUrl";
});
// Callbacks - if you have defined a callback function in your javascript then it will be called by cScanTWAIN.
MODE 2
function cScanTWAIN_OnAcquireImage(b64Imagine) {
console.log(b64Image);
}
MODE 1 or 2
function cScanTWAIN_OnDialogClosed() {
console.log("Dialog has closed");
}
MODE 1 or 2
function cScanTWAIN_OnUploadComplete(response) {
console.log(response);
console.log("Upload complete");
}
Sample Server Side PHP Code
This is the most basic code we could use to convey the upload process. You would obviously wish to handle any error
conditions that may occur server side.
Uploading the scanned document images to the backend server is generally straight forward. The documents are sent using the
POST method as base64 encoded files within a multipart form. This should be easily adaptable to most backend web
development languages and frameworks.
Saving to PDF using the popular TCPDF library
public function upload()
{
$uploadDir = '/myUploads/';
$outputFileName = 'cScan_' . date('YmdHis') . '.pdf';
$pdf = new \TCPDF();
$pdf->SetMargins(0, 0);
foreach ($_POST as $v) {
$pdf->AddPage();
$pdf->Image('@'. base64_decode($v));
}
// Save the pdf
$pdf->Output($uploadDir . $outputFileName, 'F');
// JSON response to the client
echo '{ "status":"Success" }';
}
Saving to individual PNG files
public function upload()
{
$uploadDir = '/myUploads/';
$outputFileName = 'cScan_' . date('YmdHis');
foreach ($_POST as $k => $v) {
// Extract page from key.
//In our demo app the key will be: DEMO_cscanImage-1 and so on.
$page = (int) filter_var($k, FILTER_SANITIZE_NUMBER_INT);
// Get the image and decode
$b64Image = $v;
$data = base64_decode($b64Image);
// Save to png
file_put_contents($uploadDir . $outputFileName . '_' . $page . '.png', $data);
}
// JSON response to the client
echo '{ "status":"Success" }';
}
Hints & Troubleshooting
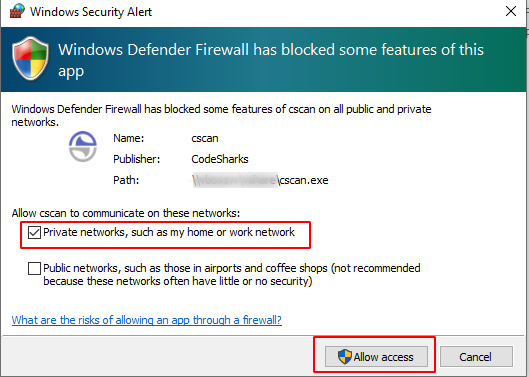
Windows Firewall
Windows may block the execution of the .exe companion application. Provided this setting works with your deployment, it is our recommendation to only allow your private network. Our application only needs to communicate with the browser from the localhost and does not need access to the internet. Please consult with your System Administrator.
Security with CORS and the Companion Application
By default the companion application will allow only localhost origin and honors only specific request types. It will not respond to other requests, forged or otherwise, and specifically works as a bridge between your web application and your TWAIN device.
TWAIN Compliant Scanner
We obviously cannot test every single scanner available, so we have used the most basic scanner
settings possible to cover a broad range of devices. Most modern scanners should work without issue but if you
run across a specific problem then we would like to hear about it.
Customizing the Viewer
This can be done by overriding the basic CSS with your own CSS file. We do not recommend modifying the css file provided with the application as this could be overwritten with a future release.
Below is a sample override of the viewer and buttons default background-color. You can place this at the top of your HTML within the HEAD section. Make sure to place it after the inclusion of cscan.min.css and depending on where you put your custom CSS then you may need to use the !important property declarative.
<style>
.cscanModalWindow {
background-color: red;
}
.cscanButton:hover {
background-color: #ffd1d1;
}
</style>
HAPPY SCANNING...
Download a Trial
